|
4 weeks has just flown by! Here we are in the final part of this series - Assessment and Monitoring. Remembering back to Week 1, the big question from a reader was: What are the teachers doing? What are the kids doing? How do you monitor and assess? As I always say, there isn't any one size fits all solution for any school and the conversations that you have as a collaborative staff are key in making these important decisions. Once again, WHY you are assessing and monitoring comes first, followed by what you will do and how you will do it. When people first start teaching collaboratively, it does feel different than a single cell class. I found it hard to keep track of all the children in my head. Sometimes I would forget who was in my reading groups and who was in my writing groups. Systems, timetables and lists became more important. After teaching 24 kids for EVERYTHING and knowing them really well, of course it's not going to be the same with 75 kids that you teach for SOME THINGS. To start with I worried that I was losing my connections and relationships with the kids and their families. But you know what? I adjusted to a "new normal". So maybe I needed to check a piece of data for a kid because it wasn't right there in my head - when I saw the huge increase in student learning, engagement and progress I could cope with that. I still had great relationships with my kids and their families - just now there was more of them and also another adult in the room who also knew them and who could share their insights with me. Danger zone - Do be careful not to create unmanageable systems that means you're recording all sorts of information that no-one will ever go back and use! How you do set up your assessment and monitoring systems will also be influenced by the numbers of students and teachers in your team. For example, 2 teachers working together might have more informal systems than 4 teachers working together. Of course, any country is governed by some formal regulations about assessment/ reporting to parents and in New Zealand we are no different. Whether you agree or not there are some things that just have to be done - so what is the best way to do them? ( This is my favourite blog post ever about reporting - worth a read!) So here's some ideas featuring systems that I have seen work well in innovative learning environments. I hope there's something here that can work for you or that you can adapt.
Below are some examples of different formats for recording information. Identifying information such as name columns and personal notes have been removed, but hopefully you get the idea! Thank you so much for reading this series! Would love to hear how your ILP journey is progressing!
Make sure you revisit the Connected Educator resources. SO many cool things! Additional Resources: VLN Thread - gathering anecdotal evidence. Enabling E- Learning Assessment Resources
0 Comments
Tony Grey's (Kowhai School) sabbatical work this year has been fantastic! Start off Week 3 of #CENZ15 with a look at this great video about the benefits of collaborative teaching.
I really like this blog post by Greg Carroll from Core Education, which explains the difference between collaboration, co-operation and connections.
Collaboration - This is where people are so inextricably linked that they couldn’t function without the others. The effect is much bigger than the sum of the two parts. In MLP this is the thing that makes the difference. Teachers share and organise the programme in ways that mean you couldn’t split the ways of working back into its parts again. As Greg goes on to say, true collaboration is still quite rare in our schools. Often there are aspects of it, but it is important to recognise real collaboration as opposed to co-operation. Of course, co-operation is required in the classroom all the time - "I'll get the PE gear - you get the kids organised into their teams." "I'll plan the inquiry unit header, you plan the maths unit header." The key difference here is that even though the co-operation makes things better, those teachers could do this on their own if they needed to. Wondering: As you reflect on your past practices or current practice, how much is co-operative and how much is truly collaborative? This week I'm looking at Collaborative Planning and ideas for getting started with this. As I mentioned last week, often when people begin co-teaching, they might begin just in one curriculum area and gradually expand on this. The same is often true for planning together. You might find when you first start that you just adapt one area of your planning, assessment and evaluating. It may make sense to both have copies of what you are doing, in place with your other planning documents.Then, as you progress, you may end up with everything being shared and worked on in one place. Some teachers still need to print out plans and write all over them. Others are happy to be in a totally digital world. It's important to cater for the teaching styles of everyone and see what suits different people. Without a doubt though, collaborative digital tools such as Google Docs making working with others to plan, assess and reflect so much easier. Most schools who are doing well with this are using GAFE, Office 365, Evernote or similar to create living documents that are owned by everyone and accessible anywhere, anytime. Some are taking it next level and sharing planning with students and parents. 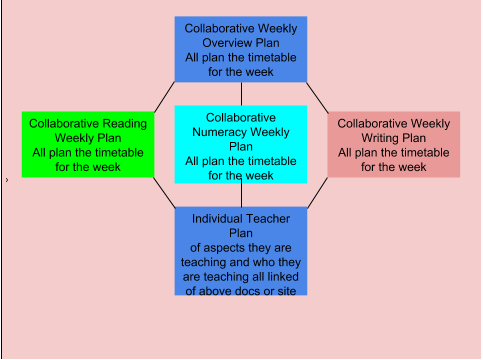
Diagram retrieved from vln.school.nz, MLE group discussion thread. Mark Maddren 2014.
This diagram from the VLN shows ways in which collaborative planning might happen. What I would add to the diagram, is the powerful conversations that take place while collective planning is going on. It's not just about timetabling, but this is when those incidental teaching as inquiry type conversations happen! "What was that awesome activity your learners were doing in reading last week?" " Does anyone have any good ideas on the best ways to introduce fractions?" " Did you notice that studentx was really struggling with getting going with writing reports?" This is where the power of collaboration comes in.
I found that once in a co-teaching situation, the quality of teaching and learning activities increased hugely. For example, I went from teaching Maths in a single cell class to Stages 3, 4, 5 and 6 groups, to working in a power of 3 teaching 3 groups at Stage 5. Even though there were variances within those groups, my understanding of the concepts at that stage improved. As I taught concepts, I had the chance to reflect and analyse what had worked well, prior to teaching the same concept to my next group. When I compared the amount of work that my Stage 5 groups got through, compared to my single Stage 5 group the year before, I couldn't believe how much more I had taught in the co-teaching situation. Take a look at these crowd sourced examples of collaborative planning templates and check out this thread of ideas on the Virtual Learning Network. Recently I was at a workshop discussing a school's journey working collaboratively. One of the key misunderstandings from the participants was they thought collaborative planning meant planning every single thing together. They were thinking that all three teachers would sit and plan for 12 reading groups all together, same for maths etc. While that might work for some, most of us simply wouldn't have enough hours in the day! More often, what would happen is that teachers would discuss their reading programme, identify any barriers to learning, share good ideas and finalise their timetable for the following week. They might organise workshop opportunities, hot spot activities, motivating lesson starters and target group instruction.Then each teacher would plan their own lessons for the students they are teaching. They would link their planning to the collaborative document so that anyone could access. (Hot Tip - link a folder that you have filed weekly plans into, rather than linking to the weekly plan. This means that you can just duplicate the last plan and the link will remain.) There is definitely still room for individual teacher creativity and teaching to strengths. Wonderings to Consider: How will you start planning collaboratively? With one curriculum area or multiple areas? How will you adjust your timetable to allow for multiple teaching and learning sessions? Do you have a MATES agreement in place? ( See #CEM 1 blog post ) What are the best systems for your teaching team to use to plan, assess and evaluate? How can you share your planning with students and whanau? What is appropriate to share? How can you include student voice in your own planning? Can students be taking on teaching roles? Are you working collaboratively or co-operatively? I hope this post helps you with your journey. Stay tuned next week for Assessment and Monitoring and my final installment for #CENZ15. Feel free to tweet/ facebook/ email with any questions or comments or requests for future posts! Additional Resources: What is collaborative teaching? Blog post by Chris Bradbeer. A typical day in a collaborative environment. Kathleen Morris Part Two of Collaborative Teaching Advantages Tony Grey Getting started with collaborative teaching will provide challenges, "aha" moments, frustrations, celebrations and rejuvenation. After three years of working with co-teachers, I couldn't imagine going back to my own single cell classroom. It would seem lonely and boring after working in a collaborative environment. My best piece of advice - "Start Small, but Dream Big". Every journey begins with a single step and to begin with they will be small. But don't underestimate your students and what they are capable of. Before you know it, your practice, learners and relationships will change and grow. Start by checking out this video of real teachers beginning their journey. Environment: Most teachers will need to make adaptations to their environment for successful co-teaching. Even if you are moving into a purpose built ILE, students need support to work in an environment where they can make choices about where they work and with whom they work. There are lots of ideas around about setting up your environment and curriculum for different types of learning, (click here for a great example) but how do you get the students started? In the first few weeks, one technique that I have found works really well is what I call "Freeze Frame." This is when the roving teaching will just call out " Freeze", while all the students are working. They will then call on students or groups of students, asking what they are doing and why where they are working is the best place to be. Often we will take photos of students making great learning choices and choosing a great spot in the environment. We then turn these into photo stories, wall posters, blog posts etc. These visual reminders are really effective - parents enjoy looking at them too. Depending on the age of the students this might be a teacher directed activity or teams of students might be working on creating these visuals. There are lots of classroom discussions with the students, looking back at the photos and really engaging the students with the process of developing self-direction, independence and agency., 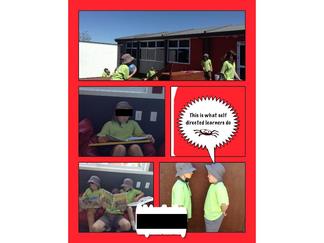 You do need to watch for students trying to claim their "favourite working place" each day. I usually minimise this by having different systems for sending students off to get started on activities, but am always looking to see if there are those who are always on the bean bags or always on the couch! Often just reminding the students about making learning choices based on their activity will prompt them to move somewhere else. There will sometimes be students who really struggle to find a good place to work. For some, the distractions of being able to work with others is overwhelming.You may even find some of your diverse learners still need a specific place in the learning zone that is theirs, for a while anyway. In any environment I have worked in, we always try to have a space that is quiet. This means that any student who needs to just work quietly, away from distractions, is able to do so. At times I have been surprised how many students have wanted to do this. This might be a break out space, or an area created by furniture. Students as interior designers is a great way of engaging students in being actively involved in the ownership of the environment. One way I have seen this used, is each Friday lunchtime a team of designers could stay in and rearrange the class. After lunch, they would briefly explain their thinking and the spaces they had created. The classes would then work in that space for the week. Sometimes the kids had some awesome ideas - things that an adult might not have thought of. There were also a few disasters, but powerful conversations from reflecting on why aspects of the design hadn't worked to support their learning. New Entrants Furniture Design Year 5/6 Furniture Design Setting up at the Beginning of the School Year. Why Schools Need Collaborative Spaces Does an MLE suit all learners? Curriculum - What might teaching and learning look like? As I talked about in CEM#1 post, do you have your value, vision and curriculum in order? There are so many ways that schools are using the NZC to create learning experiences for students that meet their unique needs and the needs of their communities. If your school doesn't have a graduate profile, I would encourage you to look here. It is vital that everyone knows what they are aspiring to achieve. Below are some ways I have seen the curriculum being delivered in collaborative teaching environments. Definitely not "one size fits all". Remember that for schools this is an ever evolving journey and is likely changing every term, as systems, teacher confidence and student self direction develops. Teachers will often trial different ideas, reflect and change. I have found beginning quite traditionally is common, usually in one subject area at a time. After a time in this experimentation phase, more integration and agency becomes possible. Examples of Curriculum Delivery
One of the key changes I have noticed when moving into collaborative teaching, is group size doesn't tend to matter. When I first began teaching, the focus was on having the smallest groups possible. When you are grouping 75 students as opposed to 25, you will often find that groups of 10 - 15 work just fine, depending on resources, ages and activity. Because the roving teacher is keeping everyone else on track, no interruptions means focused learning time for the group and they have more people to work with and learn from. Teachers have often commented to me that they began with two groups working at similar levels, but ended up joining them together with more success than working with the smaller groups. There are different schools of thought about having a roving teacher. I personally think it is the hardest job in an ILE. You are busy the whole time! It is not just about behaviour management - it is about supporting learning. When I've been roving, I've been known to take an impromptu workshop if I've spotted a common learning need. Or I might call down a group of students to go over instructions again. I have heard it said that if you were in a Single Cell, all the teachers would be "teaching" the whole time, while when there is a roving teacher, there is one less person actively teaching, so the students are being shortchanged. I would have to argue that if you are roving well, the quality learning that is going on in groups is maximised as there are minimal interruptions. Also, think back to the single cell class where you sent off groups to very quietly finish an activity. They were stuck? Well too bad for them - don't interrupt the group I'm teaching! You want to collaborate with others? No way, it's too noisy and my group is getting distracted! Now, with a roving teacher available, a student who is stuck actually has someone to ask for help, instead of sitting there or getting off task. Examples of Student Activities.
To get an even better picture in your head of what teaching and learning in an ILE is really like - check out a "Day in the Life of Clearview School".
|

AuthorMy name is Ngaire Shepherd-Wills. This website is a record of my TeachNZ sabbatical, Term 2, 2013 and then I have continued to share my wonderings and discoveries about Innovative Learning Practices. I now work for CORE Education. Views are my own. Tags
All
Archives
December 2017
|
 RSS Feed
