|
I love the easy access of virtual professional learning communities! I seem to end up checking them out while waiting in the car to pick up my kids, in the Dr's office and at other random times. The beauty and ease of online means that anytime access! I recently came across these benefits to being part of online professional learning communities. 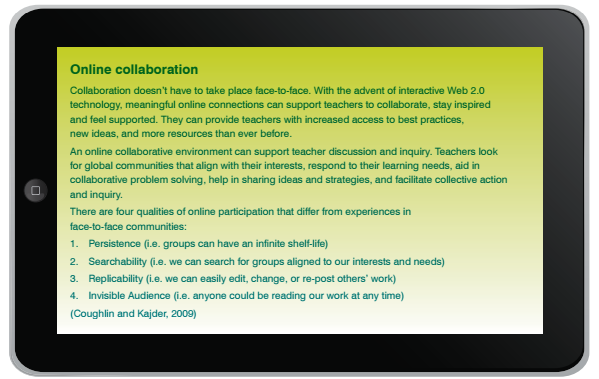 Coughlin, E & Kajder, S 2009, The Impact of Online Collaborative Learning on Educators and Classroom Practices, The Metiri Group, commissioned by Cisco Systems One of the online groups I think is worth a look has definitely been around for a while. The virtual learning network has been going for quite a few years and has some great groups worth joining. One of the key groups that I follow in the Innovative Learning Environments group. Often great discussions taking place on these.  Of course Twitter is most people's "go to" virtual community. My hot tip, find someone you know who's awesome and see who they follow! Then stalk them! Easiest way to build up your network and if they're boring, you can always unfollow them!! Using your online network to share your Teaching as Inquiry is a great way to get new ideas and support. Just make sure you participate as well. Don't just stalk!
Think about how you can connect with others professionally in 2017. Online communities are a great resource to access.
0 Comments
Last week I was talking with some teachers about different ways of planning together. Google Apps are often a "go to" tool for this and many teachers use them in amazing ways to share information, monitor and track data, record notes etc. Google Forms has been on my radar recently as a great way of recording information. Often used as a survey tool, it has the potential for SO many other uses. Recording anecdotal notes, as an exit ticket - the list is endless. It also has the ability to turn your data into graphs and tables as well as the ability to sort the data in different ways in the spreadsheet where the form responses are stored. Here's a really basic example of what a form for anecdotal notes might look like. 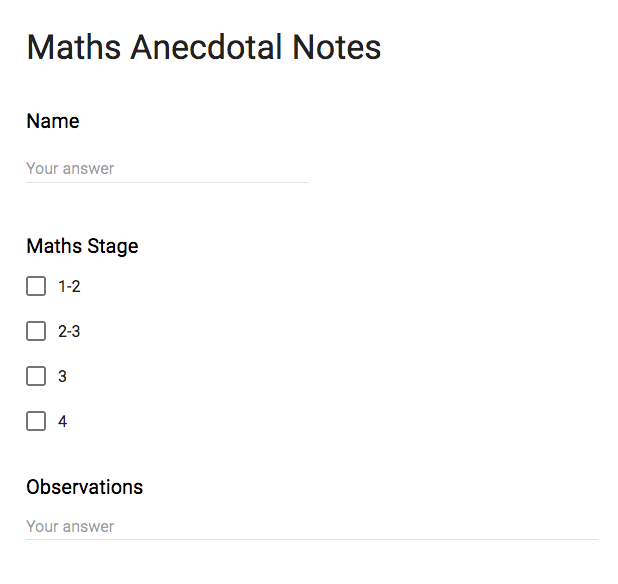 So a teacher I was working with really liked the idea of using Google Forms to record information about her learners. She would be able to have her iPad with her during group time and quickly make notes on the form. The only thing was, she already had a great setup in Google Sheets, where she had data shared with her collaborative teaching partners. They were using this really well and were making notes attached as a comment in cells on the spreadsheet. The issue was, that they had to hover over each comment to read. "If only the data on the Google Form could be stored in the Google Sheets too?" we thought. Well, the good news is it can! Here's the steps: 1. Set up your google form with the questions that you want. (This is actually a big deal! Clever drop down boxes, checklists and questions will guide the information you want to collect. Don't rush this - set it up well!) 2. Set up your Google Sheet with whatever data you want. 3. Set the destination for your Google Forms data to "an existing spreadsheet". 4. Now when you complete the Google Form, it will just create a new tab in your spreadsheet and your information will be there. New google form, same destination? New tab!  You can of course rename the tab however you wish - group names, teacher name etc. The Google Form tools can be accessed so you can view graphical representations of your data.
And there you have it - everything in one place. You can have tabs to store data and tabs to store form responses. Gotta love Google! This week I was lucky enough to go back to my old 'hood at Clearview Primary. I was catching up with Tori Wilby ( @miss_wilby, @Clearview7and8) who has been using Hapara Workspace with her Year 7/8 class. I've long been a fan of Hapara Teacher Dashboard - such an amazing way to organise google apps, which let's you take the collaborative GAFE suite next level! Hapara Workspace builds on the features of the dashboard, by allowing you to create learning pathways/ sequences of work for your students. Students are able to easily access selected resources, complete activities in google drive, collaborate easily and receive and respond to feedback. If you already have Teacher Dashboard, you have Workspace available to you also. When I visited, one of the Year 7/8 reading groups was in the process of finishing up working on the novel "Frankenstein" by Mary Shelley. A challenging text, but the students were so engaged and told me how much they had enjoyed the novel. Most students had the novel as an ebook, and some had it as a graphic novel. ( Love this differentiation - following the principles of Universal Design for Learning.) To support this novel study, Tori has run guided reading sessions, where there has been close analysis of selections from the text. Vocabulary development and comprehension have been they key focuses of these sessions. Student discussion and collaboration is planned for in these sessions.  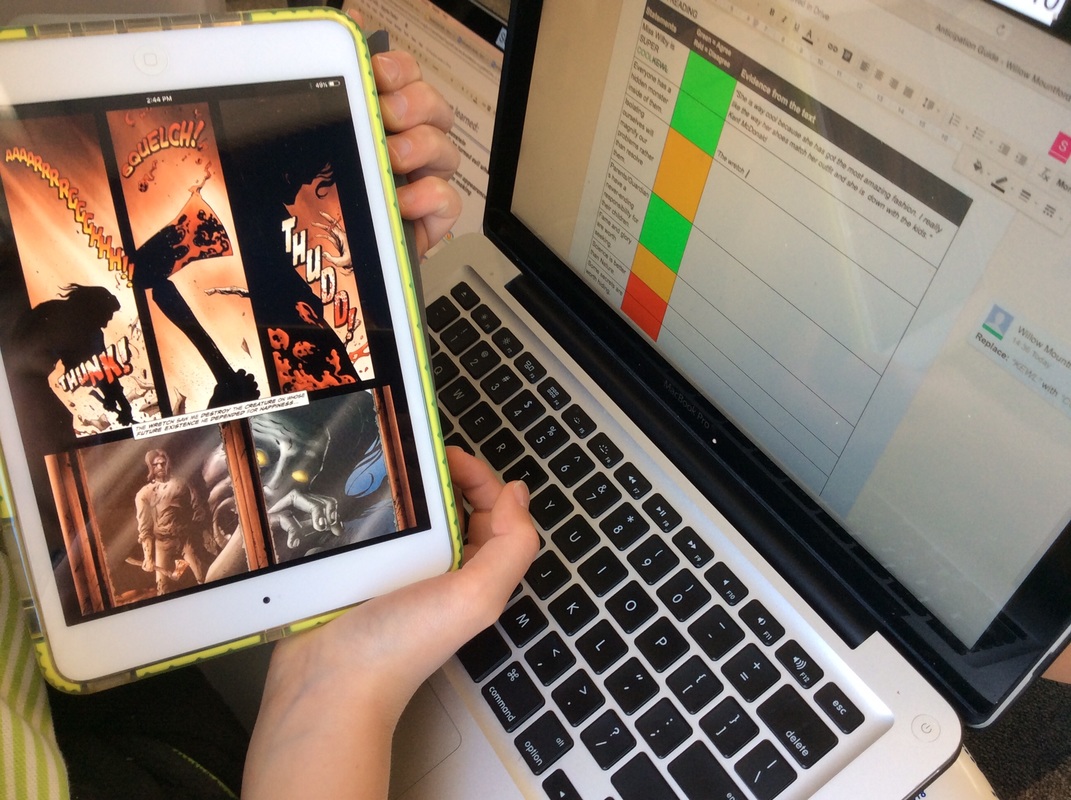 Student learning activities have then been available on the "Workspace." Tori has added relevant resources such as videos and weblinks, then attached a range of google docs/slides/forms that the students need to access in order to complete their reading task followups. Workspace allows you to sort students into groups to allow for even further levels of differentiation. Some of the activities are collaborative, with a task shared amongst a group of students and some are for individuals. When Tori opens Workspace, she can see all the learning pathways she currently has running. 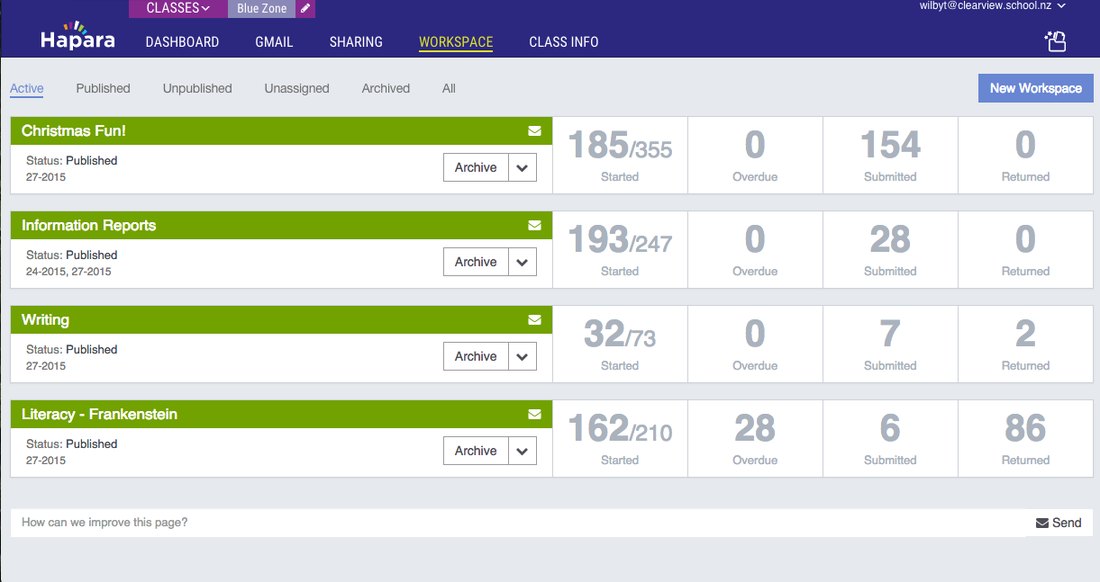 This is what the "Frankenstein" workspace set up looks like. You can add learning intentions/ goals, rubrics and more! 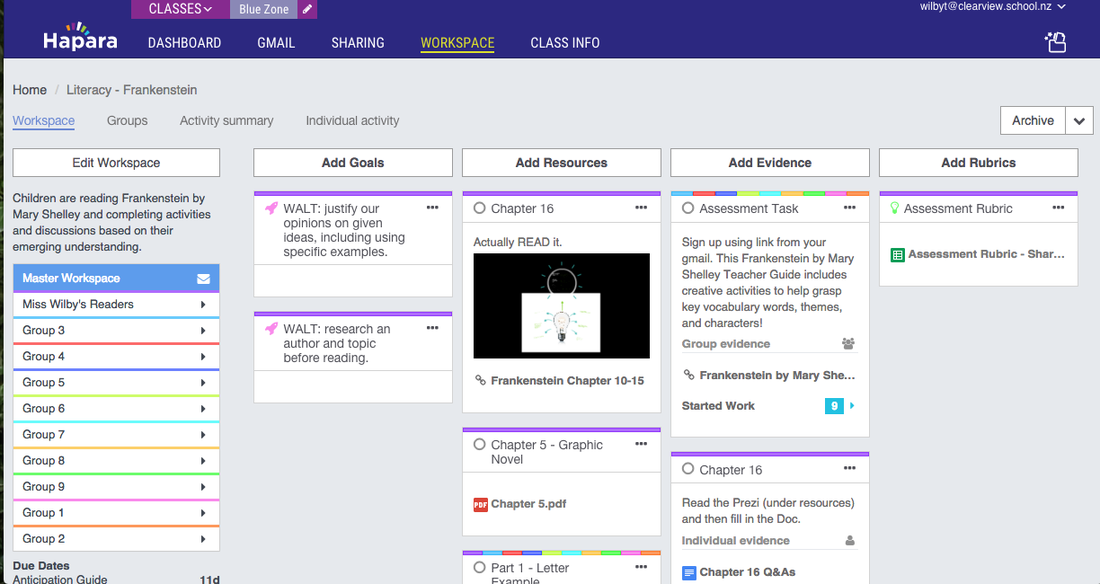 Tori highlighted the key benefits of using workspace in her classroom and for this unit of work:
An added feature in Workspace is the ability to set due dates for assignments. Once a student has submitted their work, Tori is able to assess it. If necessary, she can send the work back to the student for editing. The newly added "see recent changes" feature in google docs lets her see modifications instantly once the students resubmit their work. When Tori is happy with the completed work, she marks it as assessed. Workspace then makes a copy of the work and puts it in a separate folder. This means Tori is now the owner of that piece of work and has a final copy from that moment in time. The students get their own copy back and could make modifications if they wish, but Tori still has the finalised copy. She can then easily download these as PDF's and will sometimes make into a class book - either by printing, or importing into a programme such as Book Creator or ibooks author. 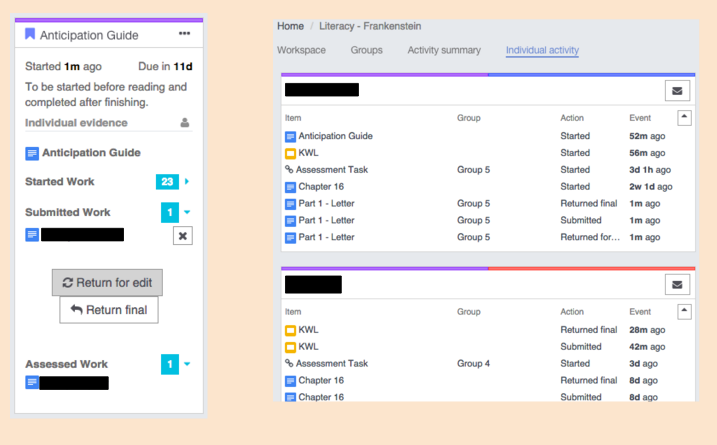  It was great to touch base with the students and talk to them about their learning. Some benefits that they highlighted from this unit of work were:
A huge thanks to Tori and the Challenge Team for having me along to their class. And MIND BLOWN: Did you know that Frankenstein is NOT the name of the monster in the story, but the name of the monster's creator?? STILL SHOCKED. Maybe I need to add this book to my summer reading list. To end with, check out these amazing thoughts from the students - the slide show below is from their K-W-L slides that they had worked on throughout the novel study. These are some of the "L" learned slides. 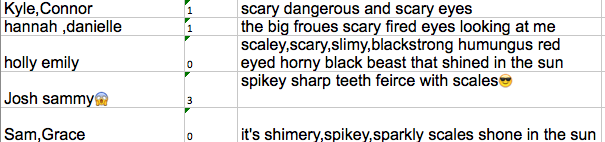
Another way I have used socrative, is to gather information about what students already know. I created a math test, using short answer questions and a few true/ false questions. This gave me so much instant information, that I could easily plan my math lessons for the week.
I also designed a short answer maths test with the answers already programmed in. The students took this at their own pace. I then printed them out their own individual worksheet, with the questions and answers, all marked. From this, they decided which workshops they needed to come to for further math teaching. They also worked collaboratively, to fix up any errors they had made in the test after the workshops. The exit ticket looks like a great way to gather information about how the learning has gone in the lesson also. Can't wait to try that out this week. I would totally recommend this app to everyone - limitless possibilities. Check out the socrative blog for more great ideas.
You can make and design your own tests, which are great, but the real power of socrative comes with the "quick question." Then socrative becomes like a mix of padlet and activ votes all in one and a brilliant collaborative tool.
Here's how we used it last week. Our students were working in learning partners, a strategy that we use all the time. Often they will have mini white boards to work on. This works well, but socrative took it to a whole new level. We are currently doing a narrative writing unit. We used a writing app to bring up different pictures - settings, characters etc. Then using the quick question setting, we asked the learning partners to write a descriptive sentence. Straight away, the sentences start coming up on the board. A buzz spread throughout the room. The incidental reading of each other's ideas was terrific. Then, by pushing "start vote", the students got to choose which descriptive sentence they thought was best. So now the competition was ON! My co-teacher and I were blown away. The quality of the writing improved with each activity. Students were trying to out do each other, hoping to be voted the best by their peers. The level of accountability was great. Instead of hoping that the students were discussing and completing an activity, we could tell by the online counter once everyone had contributed and read everyone's ideas. At the end of the activity, with one click I sent all the responses to my google drive. After school I printed them out and made them into mini-posters for our writing wall. Here's a snippet of some of the writing, where the students were describing a dragon.
I am gradually wading through my notes and ideas gained from this years GAFE Summit South. Once again, a brilliant professional learning opportunity. I always love it when you get a practical idea that is super easy to implement into the classroom and this year's one is LIFE CHANGING! It is the brilliant, wonderful socrative.com. Socrative is a classroom quiz tool, that provides instant information for teachers, depending how you use it. Socrative kind of works in 2 ways. Firstly, you set up a teacher account. Make sure you go into the settings and set up an easy room log in. For example, mine is SPARK2. Students also log into socrative as a student using your room code. It works on every device. I'm sure socrative was designed to help American teachers prepare for standardised tests, but it can be used in so many cool ways. Here's a simple introductory video. The interface has now changed visually, but the options are still the same. 
This is how the new interface looks.
One of the biggest challenges with collaborative teaching, is maintaining your teacher knowledge of the students you are responsible for, but might not necessarily be teaching. This term, our team began experimenting with Google Docs to see if this might help us. We had used Google Docs many times, especially for planning and in our power of 2's, but not assessment in our power of 6. We chose one subject area to begin with - Maths. For this term, there were two maths topics to be taught - Time and Fractions, Proportions and Ratios. We had decided to trial teaching the Time topic for two days per week and the Fractions topic for three days per week. In the past, we have tended to teach in blocks, eg. Time for two weeks, then Fractions for eight weeks. After some initial assessement, we sorted the students into 6 groups for Time instruction and 6 groups for Fraction instruction. This set up meant smaller classes for students working below the Maths standards and also the allocation of teacher aide resources to those classes. It took a week for the students to remember which was their Mon/ Tue class and which was their Wed/ Thu/ Fri class, but after Week 2, we were ok. In some cases, the students had two different teachers throughout the week. So, we taught the classes! Then we began thinking about how we could collate the assessment information so that it would be able to be used by homebase teachers to write reports. We created a google doc with tabs for each homebase. Student lists were copied from the LMS straight into the doc. We used the following headings for each topic: Can Do,Next Steps and Comment. The fractions part also had a column for a " working at" stage, as this data needed to be entered into our LMS. So this meant that once each teacher had looked at their formative and summative assessment, instead of compiling on the old "class list", they just had to jump on the google doc and fill out. 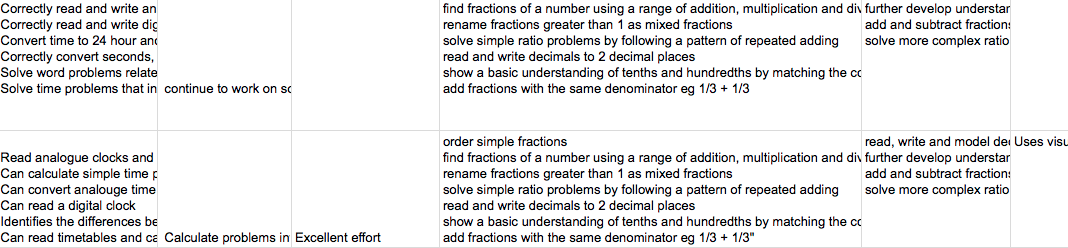 So, how did it go? The whole idea was that when homebase teachers were writing reports, they would be able to use this information to complete what the students were able to do and their next steps. On the whole, it worked quite well. When we reflected as a team we found:
Some of the comments were WAY too long. Needed to be refined. Teachers needed to make sure they followed the prompt. Eg Student is able to......, so that their comment made sense in the report. Bullet point type needed to be consistent. Teachers did not include enough information in the comment section. Our school font is Calibri, and this is not a font in google. Annoying!! We will definitely continue to use google docs and try out some different ideas. Overall, not too bad for our first time as a power of 6. Our assessment data certainly indicated some excellent progress and the teachers felt like the quality of lessons was improved. We also felt that individual needs were well catered for. There were so many awesome ideas at the summit - here's a few of my favourite links. Julie Lindsay had these great tips for using Google Search:
A great intro for beginners with google docs.
Tips and tricks for clever google add ons. The ED tech team resource page. Lots of cheat sheets, tips etc. I stalked Jim Sill around the conference, because every presentation he did was AMAZING! Inspiring, funny, talented - it was like watching a comedy show and learning at the same time.
Check out the resources below: Jim's youtube site - Jim's site that will teach you how to tame you tube, make it safe in the classroom and use it to its' full potential. Jim's map site - Make sure you are using the NEW version of google maps! Jim's guide to the google art project- this is one of the most incredible resources I have ever seen. The art project will make you want to pack your bags and travel the world's museums! Truly beautiful. Make sure you visit the art project site. Jim also recommends http://photopin.com/, for free images to use on your blog/ site. Another piece of key learning for me, was to always SIGN IN to a google site - maps, art, youtube, chrome - takes what you can do to a whole new level. It was amazing to have the opportunity to attend the GAFE south summit in the first week of the holidays! (Just dropping in their that yes, teachers do work in the holidays!) Speakers and presenters from around the world presented about teaching and learning using Google Apps for Education.
In terms of collaboration and learning anywhere, anytime, Google Apps are certainly an awesome tool for teaching and learning. This post kind of serves as my notes for the conference, but I hope you can get some ideas too! Keynote: Adam Naor We need to make sure we are teaching WITH technology, not teaching technology. Focus on the real goal. For example, improving writing, not teaching WORD or PAGES. Teachers must know how to use tools well. The google design philosophy: What is the idea that will be transformative, a catalyst for immense change? Adam discussed current technological trends. He believes were are almost there with technology being mobile and 24/ 7. Within the next three years there will be a focus on learning analytics and open content. Within five years, 3d printing and virtual and remote learning laboratories will be the norm. Adam recommended a sound knowledge of Google Search - later in the programme, Dr Mark Wagner presented on this. Find the resources here. On my visit this week to Waimairi School, principal Mike Anderson showed me how teachers there are using Hapara - a Kiwi designed application that organises Google Apps. I definitely think Google Apps are an amazing tool. As my school has been moving towards collaborative learning communities, we have been looking for ways to make learning 24/ 7, engage with families and the community and to make ICT work for us. Hapara creates a teacher dashboard, which lets you see your class and their activity on one page. Check it out!! During the demonstration that Mike gave me, I was impressed with the ease of navigation. Already I can see endless possibilities using this tool.
A focus at Waimairi has been the development of effective feedback. Students have nominated peers that provide them with feedback and the quality of this was excellent. It was great to be able to pull up a piece of student work, see how they had edited and developed it, read next steps and feedback from their teacher, parents and classmates and then see how they had responded to this. Would love to hear from anyone using hapara - or perhaps there are other similar applications out there. What other ICT tools do you think will support collaborative teaching and learning to a high level? This article also gives a good overview of the programme and check out www.hapara.com for all the details. |

AuthorMy name is Ngaire Shepherd-Wills. This website is a record of my TeachNZ sabbatical, Term 2, 2013 and then I have continued to share my wonderings and discoveries about Innovative Learning Practices. I now work for CORE Education. Views are my own. Tags
All
Archives
December 2017
|
 RSS Feed
